Clayton, our grandson, celebrated his second birthday last week. We attended the birthday party over Labor Day weekend. Last year, his first birthday party theme was sock monkeys and above is a photo I took of him for the invitation. Clayton was born nine weeks early, as you can see below, and is still small. He wears 12 month sized clothes but other than being small, you would not know he was premature.
The theme for this year's party was owls. Clayton loves owls and gets excited any time he sees one in a book, on the iPad or at the zoo. Since owls are very popular now, it was an easy theme to do. Speaking of iPads, when Clayton sees my face during Face time on the phone, he says "iPad", as he knows I always let him look at mine and all the children's apps I have on it.
I was going through my cookie cutters and noticed a witches cauldron cutter that looked a lot like an owl, so we made cookies using it. It could also be an alarm clock! It is always good to look at things in a way of other possibilities!
We love to make sugar cookies, do the royal icing piping and flooding. They taste so good, package well and are very impressive.
I made bag toppers using Spellbinders die and googly eyes for people to take a couple of cookies home in addition to serving them at the party.
Allison made treat bags that turned out so cute. She, unfortunately, does not have a die cutting machine so she has to cut everything out by hand. The top is folded down and then stapled as you will see a little further down.
Here is a card I made for Clayton. Here again, I used something that was one thing as another. The "two" was a "Z" until I trimmed off the top right corner. Also, the beak for my bag topper was a kite, both of which were discontinued Spellbinders die.
Allison also decorated lanterns to hang around both inside and outside. After the party, we hung these in Clayton's playroom.
Rather than die cutting pennants like we did for last year, Allison picked up a notepad of owls and I wrote a letter on each one to make a banner.
We did cupcakes, including the ones above, to the left with Oreo and Reese's Pieces that look like owls. Sorry I did not get a better photo of them. We used double stuffed Oreos with a brown candy for the eye and an orange candy for the beak.
I cut the watermelon below to use with the fruit. The outside of a pineapple was used for the wings, red grapefruit, lime and grapes were used for the eyes and orange peeling for the beak and feet. Skewers work great to hold on the larger pieces and toothpick will hold the smaller items.
We made a single layer cake when we baked the cupcakes and Clayton enjoyed singing happy birthday to himself, blowing out the candle and actually ate some of the cake. Getting Clayton to eat is a challenge but he is getting much better about it. He talks up a storm now and loves playing outside. Here he is on the tricycle we bought him. Allison had a shirt embroidered with an owl on it and his name that he wore at the party.
He loves all types of balls and sports and invents interesting combinations, like hitting the baseball with a golf club.
When he opened his Buzz Light year Action Figure he got for his birthday, he said, "To infinity....and beyond!" Same to you, Clayton!
Showing posts with label Spellbinders. Show all posts
Tuesday, September 3, 2013
Sunday, May 19, 2013
Spellbinders 3D M-Bossabilities
I love texture on a card! I was thrilled when Spellbinders came out with M-Bossabilities as there are two designs and I like the larger size (compared to many folders). Then they came out with 3D M-Bossabilities! I couldn't imagine the design being deeper, but these things are amazing. As a crafter who kept a notebook of "texture items" to put through my Wizard back in the day (I cut up baskets, screen, had just about every type of gutter guard made....etc), I was just thrilled how easy these make it to achieve a deep sculpted surface!
The 3D folders, due to their depth, provide only one design per folder (compared to those not 3D that have two designs per folder) but there are six different designs available. I also like the larger size of 5 by 7 inches. That size is perfect for a framed piece, like the one below. If you want to make a smaller card, just choose a portion of the design and use that only.
The shell examples above were made with watercolor paper and then the color one was water colored and the other had ink applied. You can also use these for letterpress. Apply ink with a brayer and then insert paper and run through the Grand Calibur.
Above and below, I used the Ornamental Swirls 3D folder. In June, I am the guest designer for the Quietfire Blog, Quietfire Creations. Above is a little sneak peek of the project I having coming up there in early June. I have used Spellbinders projects and Quietfire images together for years as I think they both have such a classy look! Be sure and check out the Quietfire blog and website!
This basket weave really takes me back to my texture folder of actual baskets that I had cut up! Look at that detail!
Aren't these cogs fun? You almost expect to see the gears to begin to turn! Here again, you can cut up the sections and use them individually if you want a smaller portion.
I am just beginning to play with these folders, but I can tell that it is going to be a long lasting relationship!
The 3D folders, due to their depth, provide only one design per folder (compared to those not 3D that have two designs per folder) but there are six different designs available. I also like the larger size of 5 by 7 inches. That size is perfect for a framed piece, like the one below. If you want to make a smaller card, just choose a portion of the design and use that only.
The shell examples above were made with watercolor paper and then the color one was water colored and the other had ink applied. You can also use these for letterpress. Apply ink with a brayer and then insert paper and run through the Grand Calibur.
Above and below, I used the Ornamental Swirls 3D folder. In June, I am the guest designer for the Quietfire Blog, Quietfire Creations. Above is a little sneak peek of the project I having coming up there in early June. I have used Spellbinders projects and Quietfire images together for years as I think they both have such a classy look! Be sure and check out the Quietfire blog and website!
This basket weave really takes me back to my texture folder of actual baskets that I had cut up! Look at that detail!
Aren't these cogs fun? You almost expect to see the gears to begin to turn! Here again, you can cut up the sections and use them individually if you want a smaller portion.
I am just beginning to play with these folders, but I can tell that it is going to be a long lasting relationship!
Monday, January 21, 2013
Quietfire Fairy Tale
You know I love beautiful lettering and calligraphy and one of my favorite companies for stamps is Quietfire Design. One of my favorite companies for die is Spellbinders, so I have combined the two to create this framed quote accented with a rose. The heart stamp was used both on the quote and as leaves for the rose I created with Blossoms five die.
Quietfire is located in Alberta, Canada, whose flower is the wild rose, so another reason this all works. I love it when these images make their way from our friends up north, but I would prefer that they keep those arcrtic blasts like we will be experiencing this week up there! LOL! Be sure to check out all of Suzanne's images at Quietfire!
This is the first flower I made with this die set and I think it turned out very pretty if I say so myself! Must be the fact that it is a great die design and I followed instructions given by my friend Linda Duke last summer when the die was introduced. Just click on "instructions" above and watch Linda's video. I used three colors of ink rather than two. For the leaves, I embossed the heart design in gold on watercolor paper and then painted with an iridescent watercolor. I hand cut the "leaves" and curled them before adding them to the flower.
I have always loved this quote and have been busy working on projects for my niece's wedding who is getting married in May, so I guess I had fairy tales on the mind. Quietfire has other new stamps that are specifically for Valentines Day and I will share those soon, but I love thinking out of the box. Using the heart design as the leaf for this flower I had been wanting to try since last summer jumped to the front of the line. The flower and "leaf" also makes me think of camellias, which are our roses of winter here in the south and are so lovely right now. I am sure I will see some in Savannah, Ga on my trip there this week. I will have to play with making a yellow fringe center and the same leaves to create a camellia!Quietfire is located in Alberta, Canada, whose flower is the wild rose, so another reason this all works. I love it when these images make their way from our friends up north, but I would prefer that they keep those arcrtic blasts like we will be experiencing this week up there! LOL! Be sure to check out all of Suzanne's images at Quietfire!
Friday, August 10, 2012
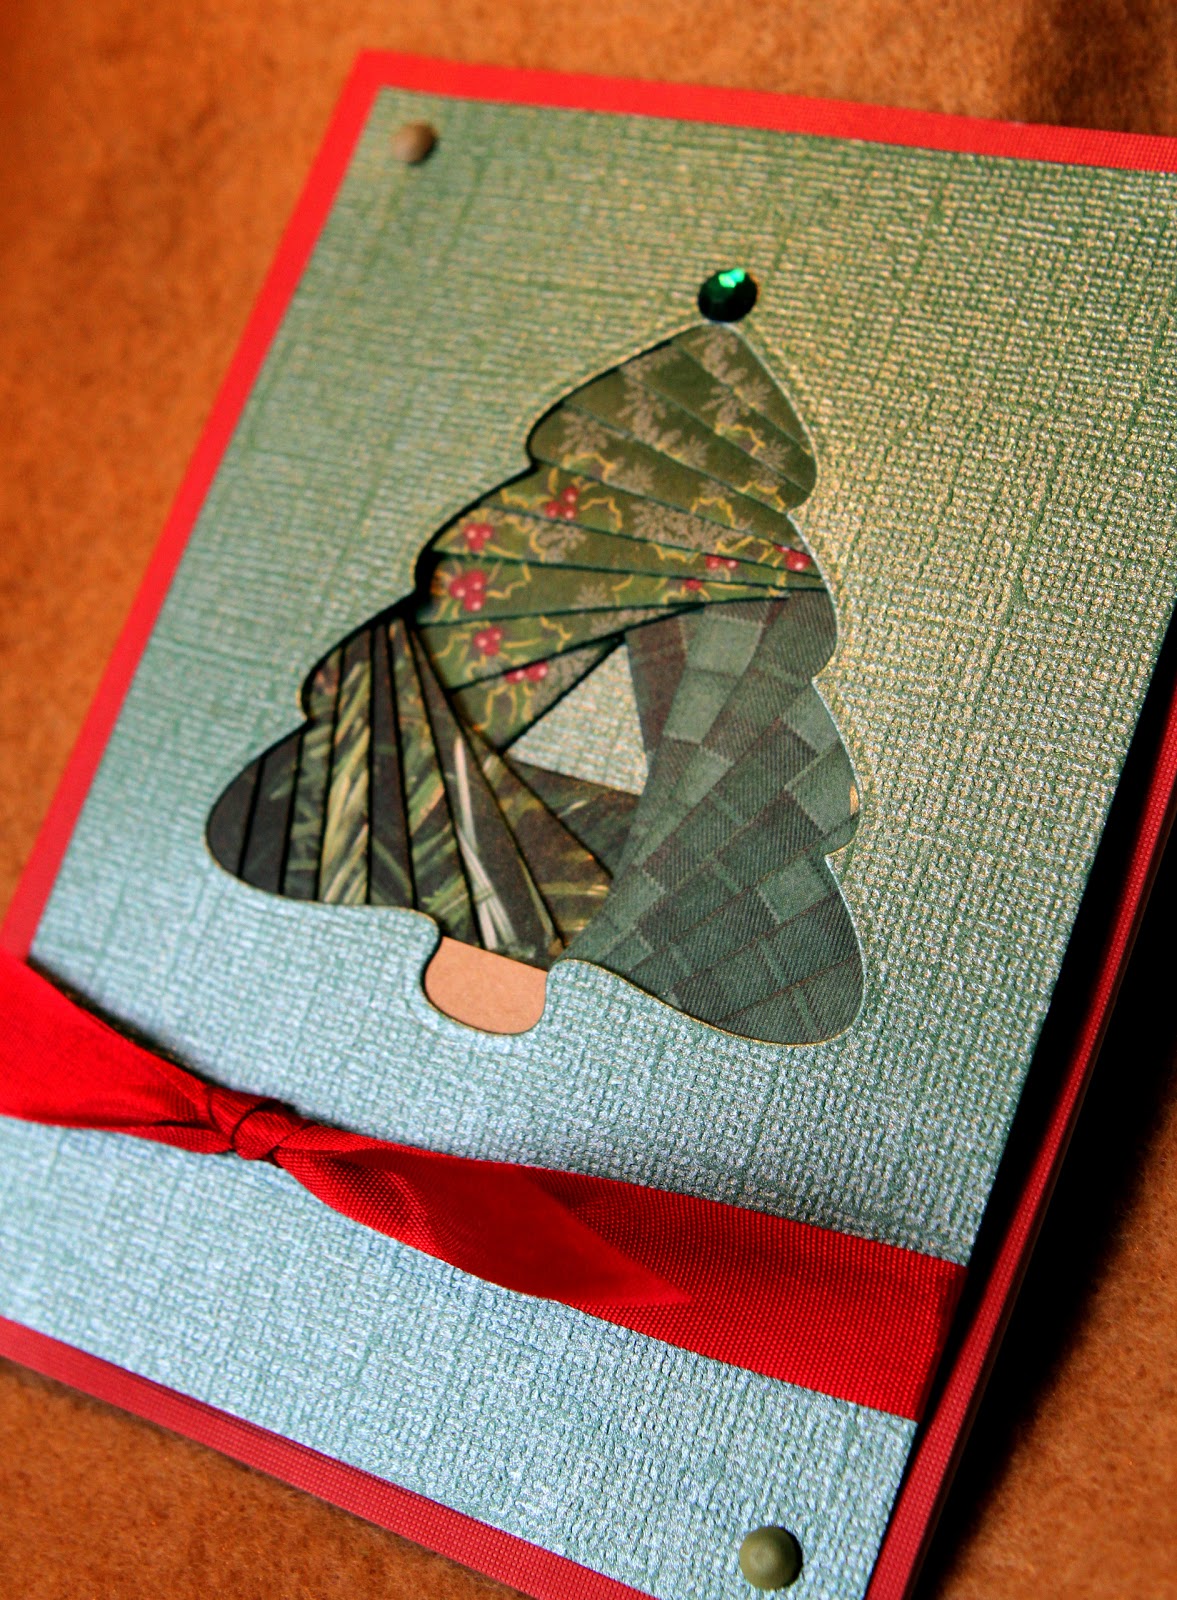
Using Diecuts for Iris Folding...Create your own Pattern!
I remember how complicated Iris Folding appeared to be when I first saw it. Though it takes a little time, it is actually quite easy. One way to make it even easier is to use diecuts for the aperture shape. Here I have used shapes cut from dies and geometric iris folding patterns to customize a pattern for that shape. The tree, owl, mitten and cup are all Spellbinders die while the pumpkin and ornament are from Serendipity.
Most patterns are a geometric shape...triangle, square, pentagon, hexagon or oval. The templates for these geometric shapes can be found online. One source I found is here at IrisFolding.com. In addition to the geometric shapes, they have alphabet, numbers and several decorative shapes. They also sell a book called Simplicity of Iris Folding. I have not seen the book, but you can learn how to do Iris Folding online, if you don't understand the concept.
Another source for patterns and information is the Yahoo group. Iris Folding at Yahoo Groups has recently been revived and has become quite active. I recommend this group!
I suggest you get a loose leaf notebook, some page protectors and print the five geometric shape templates. Using a page protector keeps your pattern from getting messed up. Diecut your aperture from cardstock. Use reposition able tape along an edge so that you can lift your design as you work it and check on the progress. You can also print on acetate and then look on the other side of the pattern to check on your progress.
I choose the shape I use depending on the basic shape of the diecut. I meant to use the triangle on the owl going the other direction to form a beak....I will correct that next time I do an owl design! The shape you choose will also determine how many different papers you use. On the ornament, I used each of the wrapping papers twice rather than using four different papers. I like wrapping paper as it is thinner and doesn't create as much bulk.
Below, you can see the geometric shapes I have printed on acetate and placed in a protector. Patterns are often numbered and then a letter added to show the order and what paper to use.
Another way to show the paper to use is to color the design (these I drew in pencil on vellum) like I did on the cup. First trace the aperture and then place over the desired geometric shape. You might have to continue the pattern to fill up the aperture. I draw them on vellum (or tracing paper) so that I can see the geometric pattern beneath it. Using this technique, you can create an iris folding pattern for most any shape you can diecut!
Sometimes shapes will call for you to create a pattern. Several years ago I created a pattern for a tie (business envie size) for which I used safety envelopes for the paper. It was published in The Rubber Stamper Magazine. Recently, I found a die (Dee's Distinctively Dies) that cuts a tie, so I drew out the pattern for this tie, beginning at the edges and going in. An iris folding pattern is basically a shape in graduated sizes, tilted a little each time. I actually made two separate patterns for the two areas, just as you would for butterfly wings, etc. Sometimes the folding pattern actually becomes part of the design of the shape. If you look at some of the photos at the Yahoo group, you will see what I mean.
I have not done Iris Folding in years, but with the revival of the Yahoo group as well as new die in my stash....I had to give it a visit! I am a little rusty! My friend, Jan Castle, does some of the neatest Iris Folding I have ever seen!
So, pull out those die and papers and have fun!
Most patterns are a geometric shape...triangle, square, pentagon, hexagon or oval. The templates for these geometric shapes can be found online. One source I found is here at IrisFolding.com. In addition to the geometric shapes, they have alphabet, numbers and several decorative shapes. They also sell a book called Simplicity of Iris Folding. I have not seen the book, but you can learn how to do Iris Folding online, if you don't understand the concept.
Another source for patterns and information is the Yahoo group. Iris Folding at Yahoo Groups has recently been revived and has become quite active. I recommend this group!
I suggest you get a loose leaf notebook, some page protectors and print the five geometric shape templates. Using a page protector keeps your pattern from getting messed up. Diecut your aperture from cardstock. Use reposition able tape along an edge so that you can lift your design as you work it and check on the progress. You can also print on acetate and then look on the other side of the pattern to check on your progress.
I choose the shape I use depending on the basic shape of the diecut. I meant to use the triangle on the owl going the other direction to form a beak....I will correct that next time I do an owl design! The shape you choose will also determine how many different papers you use. On the ornament, I used each of the wrapping papers twice rather than using four different papers. I like wrapping paper as it is thinner and doesn't create as much bulk.
Below, you can see the geometric shapes I have printed on acetate and placed in a protector. Patterns are often numbered and then a letter added to show the order and what paper to use.
Another way to show the paper to use is to color the design (these I drew in pencil on vellum) like I did on the cup. First trace the aperture and then place over the desired geometric shape. You might have to continue the pattern to fill up the aperture. I draw them on vellum (or tracing paper) so that I can see the geometric pattern beneath it. Using this technique, you can create an iris folding pattern for most any shape you can diecut!
Sometimes shapes will call for you to create a pattern. Several years ago I created a pattern for a tie (business envie size) for which I used safety envelopes for the paper. It was published in The Rubber Stamper Magazine. Recently, I found a die (Dee's Distinctively Dies) that cuts a tie, so I drew out the pattern for this tie, beginning at the edges and going in. An iris folding pattern is basically a shape in graduated sizes, tilted a little each time. I actually made two separate patterns for the two areas, just as you would for butterfly wings, etc. Sometimes the folding pattern actually becomes part of the design of the shape. If you look at some of the photos at the Yahoo group, you will see what I mean.
I have not done Iris Folding in years, but with the revival of the Yahoo group as well as new die in my stash....I had to give it a visit! I am a little rusty! My friend, Jan Castle, does some of the neatest Iris Folding I have ever seen!
So, pull out those die and papers and have fun!
Thursday, August 2, 2012
Watercolor tricks for Papercrafters, using Serendipity Stamps
It's that time of year again....time for the new fall and winter stamps to begin coming out...so exciting! Of course, some images just call for the watercolor brush to come out of hiding!
I love using markers, but I still love even more the looks possible and speed of using watercolor.
I thought I would go over some tricks of watercolor while showing you these great new images from Serendipity Stamps. I also used Spellbinders Die to cut out a couple of the images. Notice the clean little border around the diecut? This is a fun edge I did by applying embossing ink to the actual die and then diecutting the image. Afterwards, I applied clear embossing powder to the edge and hit it with the heat gun. The clear embossing powder masks the delicate edge and keeps watercolor away, while also giving a nice little sheen. I can work very quickly wet into wet to create a very cool background.Another trick I did on the background was to apply a little paint with a sheen and then I sprinkled some table salt over the wet watercolor. Allow the paint to dry and then brush off the salt. It will create a great mottled effect. Once the cards were finished, I spattered some of the pearl color paint with a sheen over the image. Lots of things happening there, but all of them were easy and quick.
On the ghost and quail, I also did some water embossing by manipulating the watercolor paper. I outlined the area I wanted to puff out with a stylus on the image, placing the image on something soft like a mouse pad or piece of fun foam. On the reverse side of the image, you can see the outline. I applied water to the back and then manipulated the paper with the stylus. To keep the "puffiness", I used foam adhesive tape in the raised areas. Notice that the quail image was torn out and spattering applied using brown paint. This gives a more rustic look.
To make the pumpkin pop, I applied some glossy accents and allowed it to dry. Also, a little glitter was added to the spider, bat and face of the ghost.
Here are a couple shots showing the cutting side of the Spellbinders die. The VersaMark ink was applied directly to the cutting side of the die and then clear embossing powder added to the cut out images. But don't throw away the outside portion...below, you can see that I applied gold embossing powder and will use this for another project.
Watercolor paint with a sheen is a great accent like on the window and snow above. I prefer to use it in limited amounts, only on what I want to really stand out.
Another way to make an image pop is to layer a portion of the image. Below, I stamped extras of the hand with the watering can, hat, face and scarf. I used pop dots to add dimension between the layers.
The sun was really bright when I took the photos below, so the colors are a little washed out compared to real life, but hopefully you will enjoy seeing the great new images as well as try some of the watercolor techniques I have included. Just do a search on my blog to see more posts on watercolor techniques.
Serendipity also has great word stamps to go with these images, but I wanted to focus on the new images and some watercolor techniques. Enjoy! Wow, I haven't even pulled out the watercolor crayons yet....or the Copic markers! So many possibilities! Oh, and I just saw on the Serendipity website that they are offering free shipping on orders over $10....whooo hooo! I love free shipping!
Labels:
serendipity stamps,
Spellbinders,
water embossing,
watercolor
Sunday, February 13, 2011
Valentine Cards
I mentioned in an earlier post that I received a lovely valentine from my friend, Tina. Here it is. She commented that she designed this card the week we were snowed/iced in here in Atlanta, so she had to "make do" with what she had on hand....hate to see what she would come up with if she went to the store and chose materials! LOL! Tina is the queen of layering. I counted twelve layers on this card, beginning with the Happy Valentines banner that she cut out by hand back to the actual card! I told her I had heard of seven layer salads, but a twelve layer card? Just lovely! I gave her the chain punch from MSC that she has the little hearts on (covering the flower) for her birthday and she put it to good use. Thanks, Tina!
My cards are a little simpler! I did several of the quilted ones like below. I used paper, stamps and embellishments from We R Memory that were all coordinated. I guess that is cheating to use coordinated things, but something about it reminded me of the days of getting the box of Valentines back in my childhood and going through and choosing certain ones for certain people.
For my quilt, I did my pieced quilt, quilted with gutter guard and then used Spellbinderders heart as the frame. I have several of these heart die from the time there was a mess up on the die and I was on the DT and working at CHA, so I was able to cut four frames at a time in my Excalibur! I thought the embossed embellishments that We R Memory had to go with the papers and stamps were very pretty....and simple to put together in a card. Makes me feel a little guilty after seeing Tina's beautiful layered card...oh well, I will get over it!
My cards are a little simpler! I did several of the quilted ones like below. I used paper, stamps and embellishments from We R Memory that were all coordinated. I guess that is cheating to use coordinated things, but something about it reminded me of the days of getting the box of Valentines back in my childhood and going through and choosing certain ones for certain people.
For my quilt, I did my pieced quilt, quilted with gutter guard and then used Spellbinderders heart as the frame. I have several of these heart die from the time there was a mess up on the die and I was on the DT and working at CHA, so I was able to cut four frames at a time in my Excalibur! I thought the embossed embellishments that We R Memory had to go with the papers and stamps were very pretty....and simple to put together in a card. Makes me feel a little guilty after seeing Tina's beautiful layered card...oh well, I will get over it!
Hope everyone has a great Valentine's Day....more cards to come!
Subscribe to:
Posts (Atom)