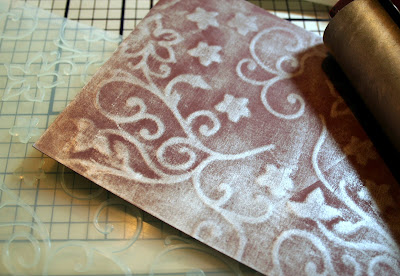
I have taken cake decorating classes, but I don't plan on doing fondant any time soon...so why do I have Wilton fondant imprint mats? Because I thought they would make a great letterpress look in the Wizard! Call me crazy! These are 20 inch by 20 inch silicone mats that come in two designs. I cut a strip off of each that gives me three pads to use and plenty still to do fondant if I have a change in heart :-). These mats run $20 each, but I used a %50 off coupon...you could always go in with a friend if you have no desire to use them for fondant. I think they would be great for clay too. I plan on trying them to add designs to cookies.
Here are some examples of the paper I ran through. I use a sandwich of a white mat, two embossing pads and a blue charm mat, along with the paper and imprint mat. They are easier to wash than cuttlebug folders if you ink them and you can cut them larger than cuttlebug folders. The paper will come out debossed on one side and embossed on the other. I applied the ink for the debossed (letterpress) side.
The red and purple papers are handmade papers that I spritzed with Paper Glide. Btw, if you have had trouble with your Paper Glide getting stopped up, but sure to always put the little clear cap back on when finished using it. You can even stick a little wet cotton ball in the clear cap to keep moisture and avoid it drying up and clogging the nozzle. You can also spray several pieces of paper in advance, allow them to dry and use them when you need them. The special stuff that aids in embossing will be in the paper. Cool, huh?
The aqua paper is a heavy card stock and the dark burgundy (that looks silver now) is Touche paper.
I determined that a brayer is your friend on this letter press technique. Just brayer the ink on the imprint mat and then you don't get the ink in the background like you see on some of the examples when I just applied it from the pad.
This touche paper was turned over to the embossed side and then I brayered ink over it...it has the look of tooled metal in real life.
I haven't made up any finished samples with the paper I have debossed, but you know they will be coming!
Just wanted to remind you to keep your eyes open for other things you can use in your crafting!
Copics tomorrow!
Subscribe to:
Post Comments (Atom)


4 comments:
Thanks for the idea -- will have to check out the cake decorating section now!
You are SO CLEVER, Holly. Thanks for the inspiration. Your samples are gorgeous.
WOW! This is some of the prettiest paper I've ever seen! Great idea! Looking forward to seeing what you use this paper to create. Thanks again for the watercolor info.
What a great tip! Thanks so much!
Post a Comment